Shell reinforcement: shear
When Shell reinforcement: shear is selected in the subtype selector, the Auto design workflow is used to define shear reinforcement preferences and run automatic design for selected shell objects.
Tool palette

The Auto design tool palette contains the following tools and options:
-
Parameters – opens the shear reinforcement design parameters dialogue for selected shell objects.
-
Design – runs automatic shear reinforcement design with the current settings.
-
Calculation – available in the design workflow as a drop-down menu where you choose Load combinations or Load groups as the design basis.
-
Display table – checkbox that shows the utilization table when enabled.
-
Delete options – checkboxes for deleting existing reinforcement during design run:
- Manual
- Auto
Parameters dialogue
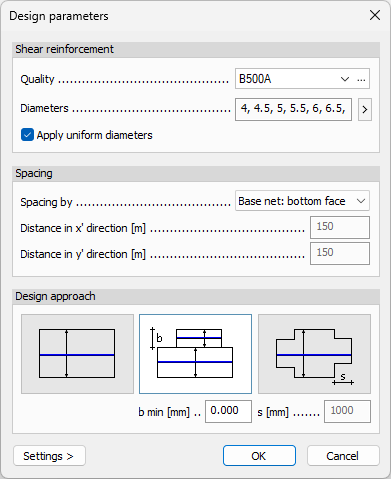
When you start Parameters, the Design parameters dialogue opens. The dialogue consists of three main groups: Shear reinforcement, Spacing, and Design approach.
Shear reinforcement
-
Quality – drop-down list with available material qualities for stirrups.
-
Edit library – opens the material library for quality management.
-
Diameters – list of available diameters shown as comma-separated values.
-
> – diameter selection button opens a small dialogue where you select one or more diameters using checkboxes.
-
Apply uniform diameters – checkbox that applies one uniform diameter setup.
Spacing
-
Spacing by – drop-down menu with these options:
- Base net: bottom face
- Base net: top face
- User-defined values
-
Distance in x' direction – spacing value in the local x direction, available only when User-defined values is selected.
-
Distance in y' direction – spacing value in the local y direction, available only when User-defined values is selected.
Design approach
-
Minimum number of rectangles – minimizes the number of reinforcement rectangles.
-
Minimum area of rectangles – minimizes reinforcement rectangle area and enables:
- b min
-
Stepped – applies stepped distribution and enables:
- s
Design tool
Use Design directly in the model view by selecting shell objects, or run design from the Utilization table dialogue.
When Display table is checked and you start Design, a Utilization table opens.
Utilization table structure
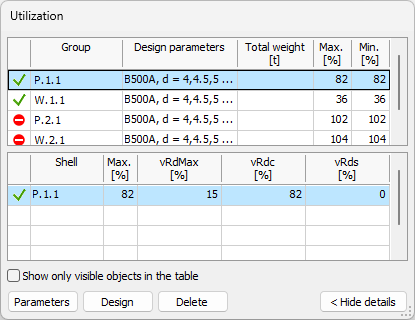
The Utilization table is split into two tables:
-
Groups table (top) – shows design groups and ungrouped single elements.
-
Element details table (bottom) – shows detailed utilization results for elements in the selected group, or for the selected ungrouped single element.
Groups table columns
The groups table uses the same columns as in bar auto design and longitudinal shell auto design:
-
Passed – unnamed status column that shows if design has been run and what the result is.
-
Group name ��– group name, or the element name when the row is an ungrouped single element.
-
Design parameters – short overview of the selected design parameters for the group or element.
-
Applied section/Total weight – applied section together with total weight.
-
Max – maximum utilization within the group.
-
Min – minimum utilization within the group.
Element details table columns
The shear element details table contains the following columns:
-
Passed – unnamed status column with pass/fail icon result.
-
Element name – name of the element.
-
Max. – maximum utilization value for the element.
-
VRd max – shear capacity of the concrete compression strut.
-
VRdC – shear capacity without shear reinforcement.
-
VRdS – shear capacity with shear reinforcement.
Table options and buttons
Below the element details table, the following controls are available:
-
Show only visible objects in the table – limits table rows to currently visible objects.
-
Parameters – opens the same Parameters dialogue as in the tool palette, for the selected group or element.
-
Design – runs design for the selected element in the table.
-
Delete – deletes the added quantity from the selected element.