Storey
Use the Storey tool to add or change storeys in the model.
![]()
When you select Storey tool, a new tool palette opens.

- Define – add a new storey by selecting horizontal objects or point supports
- Delete – remove the selected storey
- Edit in table – opens a new dialogue window where you can add or change storeys in the model (read below in more detail)
- Tolerance – use the numeric value to enter a tolerance for adding new storeys. If multiple objects are selected and their positions are closer to each other than Tolerance, Storey will be generated at the bottommost object’s level.
Edit in table
When you press Edit in table on the tool palette, a dialogue window opens.
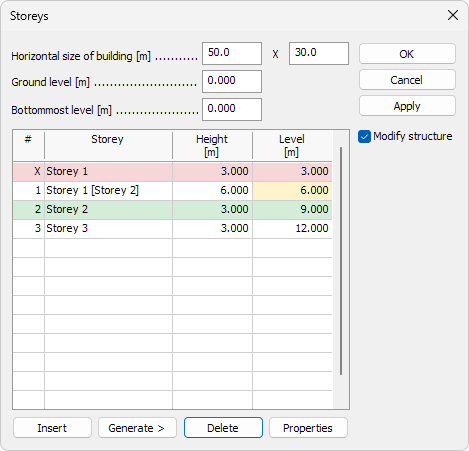
- Horizontal size of building – use the numeric values to enter overall dimensions of the building for better automatic load generation with macro tools
- X - size in global X-direction
- Y - size in global Y-direction
- Ground level – elevation of the ground for better automatic load generation with macro tools
- Bottommost level – lowest elevation from which the Level of each Storey is measured
- Storey – name of the storey
- Height – height of the storey
- Level – elevation of the top of the storey, measured from Bottommost level
- Insert – add a new storey above the selected row, shifting existing rows down if needed
- Generate > – opens a new dialogue window, where you can create multiple storeys at once by specifying the amount and floor-to-floor height with a specific formula (read below in more detail)
- Delete – remove the highlighted storey
- Properties – open a dialog for Storey symbol colour, label style and other appearance settings for the selected storey (read below in more detail)
When you add, change or delete something, the table rows will show colors on the cells which were modified.
Green means added storey, yellow means modified storey and red means removed storey.
Generate dialogue
When you press the Generate > button on the Edit in table dialogue, a new dialogue window opens.

- Distances – enter a single value (for example "3.5"), a series of values (for example "3.5,4,3,3,2.8") or a pattern (for example "2x3,5x3.2") to generate multiple Storeys. For the patterns with multiplication, the first number is always the amount and the second number is the height value (for example "2x3,5" means - two times 3m height storeys plus one 5m storey)
It is necessary to use period character for separating the decimals (for example "3.5").
It is possible to use both comma and space characters for separating different dimensions (for example "3.5,4" or "3.5 4").
It is possible to use both asterisk and "x" character as the multiplication symbol (for example "3.5*12" or "3.5x12").
Storey symbol properties
When you press the Properties button on the Edit in table dialogue, a new dialogue window opens

Symbol
- Color – change the outline color of the storey symbol
- Pen – change pen width (line thickness) of the storey symbol
- Size – change the diameter of the circle marker in the storey symbol
Label
- Color – change the color of the storey elevation text
- Font – change font family and other parameters of the storey elevation text. This opens a new dialogue window (read below in more detail)
Font
When you press the Font function in the Properties dialogue, a new dialogue window opens.

- Font – select the font family
- Size – change the text height
- Width factor – control the horizontal scaling of the text
- B, I, U – apply bold, italic or underline formatting
ab- display the text with a strike-through effect- Get default arrow button - restore all the settings to their default values
A live preview is shown in the Sample text field.