Wall corbel
Use the Wall corbel tool to insert a short bracket at the face of a wall for supporting beams, slabs, or other horizontal elements.
![]()
When you select Wall corbel, a tool palette opens.

Main tools
- Define – place a new wall corbel on an existing wall
- Properties – check or edit the properties of an existing wall corbel. Opens the Default settings dialogue for the selected corbel
- Default settings – set default parameters for wall corbel geometry, connection, and material (read below in more detail)
Placement setting
Available when the Define tool is selected.
- Side – choose the wall side where the corbel will be placed
- Plus – places corbel in the walls positive z’ direction
- Minus – places corbel in the walls negative z’ direction
Default settings dialogue
When you press the Default settings button, a dialogue window opens.
This dialogue contains three tabs: General, Connection, and Material.
General tab
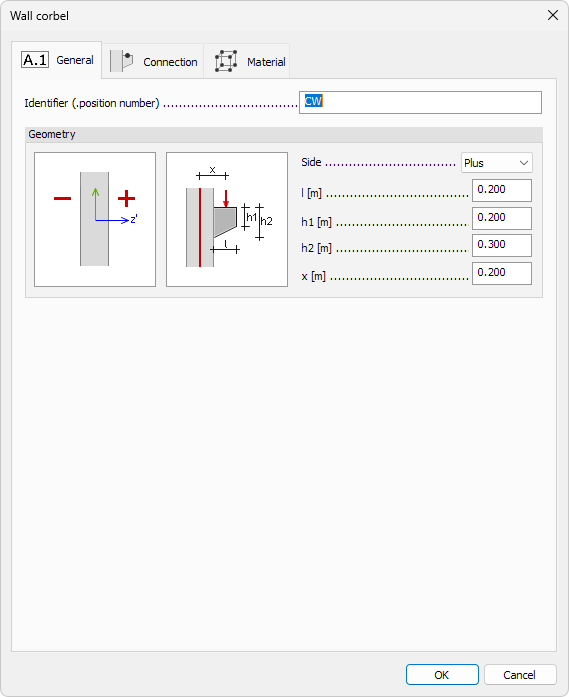
This tab defines the geometry and placement of the wall corbel relative to the host wall and its loading configuration.
- Identifier – optional name or label for the corbel
- Side – drop-down menu to choose the wall side where the corbel will be placed
- Plus – places corbel in the walls positive z’ direction
- Minus – places corbel in the walls negative z’ direction
- l – length of the corbel perpendicular to the wall
- h1 – height of the corbel front edge
- h2 – height of the corbel connection to the wall
- x – longitudinal distance from wall reference line to the applied load
Connection and Material tabs
These follow standard practices for shell components and are defined elsewhere.
note
To read more about these settings, see the relevant topics below:
- For Connection tab see:
User interface ➔ Tab menus ➔ Structure ➔ Additional dialogues ➔ Edge connections - For Material tab see:
User interface ➔ Tab menus ➔ Structure ➔ Additional dialogues ➔ Regular Material