Snow
Snow
Use the Snow tool to quickly add design code based snow load to different structures using the Climate load panels.
![]()
When you select the Snow, a new tool palette opens.

Main tools on the tool palette
| Description | |
|---|---|
| Use Define edge object tool to define edge object on an existing Climate load panel. Only for Flat roof and Lean-to panels. | |
| Use Edge object properties tool to check properties of Edge objects. This will open the Default settings dialogue for the selected Edge object(s). | |
| Use Panel properties tool to check properties of Climate load panels. This will open the Climate load panel, snow load data dialogue for the selected panel(s) (read below in more detail). | |
| Use Generate snow load tool to open another dialogue window, where you can select settings for the snow loads generation (read below in more detail). | |
 | Use Default settings tool to change some settings (read below in more detail). |
Defining new edge objects
Only available with Define edge object function.
| Description | |
|---|---|
| Use Draw edge object tool to draw a new edge object on an existing Climate load panel. | |
| Use Generate edge objects automatically tool to automatically generate some Edge objects types for all the suitable Climate load panels in the model. This will open the Snow load panel edge object wizard dialogue (read below in more detail). |
Default settings
The Default settings tool opens a new dialogue window.
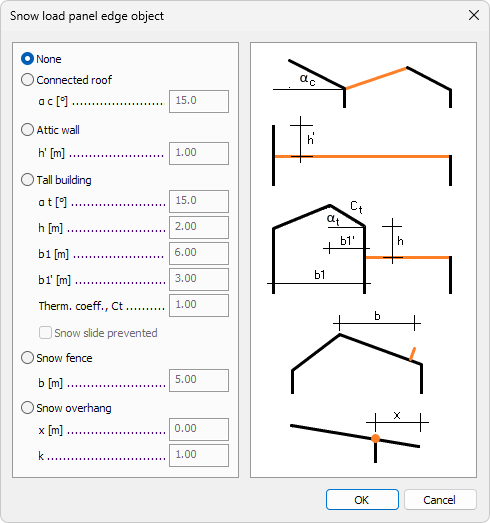
On the left hand side, you can select which type of Edge object you are defining. On the right hand side, you can see images of the types with the parameters explained.
- None – select this to make the Edge object not act like any of the options below
- Connected roof – select this for Edge objects that are close to another connected roof
- α c – set connected roof angle
- Attic wall – select this for Edge objects that are close to an attic wall or parapet
- h' – set parapet height above the roof
- Tall building – select this for Edge objects that are close to a tall building wall
- α t – set tall building's roof angle
- h – set the wall height for the tall building above the current roof
- b1 – set the depth of the tall building's roof
- b1' – set the distance from the wall to the ridge of the tall building's roof
- Therm. coeff., Ct – set the thermal coefficient of the tall buildings roof. Ct ≤ 1.0
- Snow slide prevented – select if the snow slide from the tall building roof to the current roof is prevented
- Snow fence – select this for Edge objects that are close to a snow fence on the roof
- b – set the distance from the snow fence to the ridge of the tall building's roof
- Snow overhang – select this for Edge objects that are close to an overhanging roof
- x – set the distance of the overhang
- k – coefficient for the irregular shape of the snow
Climate load panel, snow load data
The Panel properties tool opens a new dialogue window.

- Thermal coefficient, Ct – thermal coefficient according to [G1]EN1991-1-3 5.2 (8)
- > – click on the Auxiliary data arrow button next to the Thermal coefficient, Ct numeric field to open a new dialogue window where you can set auxiliary data so, that the Thermal coefficient, Ct can be automatically calculated. Only available on some design codes.
Auxiliary data
When you click on the Auxiliary data arrow button next to the Thermal coefficient, Ct numeric field, a new dialogue window opens. Only available for Norwegian and Polish design codes.
-
Norwegian code

- θ – lowest expected room temperature in winter
- U – heat transfer coefficient for external thermal surface resistance [W/(m2K)]
- Re – External thermal surface resistance for U-value [m2K/W]
- Average temperature in February is lower than -8°C – if checked Ct will be multiplied with 1.2, but not be higher than 1.0. If unchecked Ct will be calculated as normal
-
Polish code

- ti – internal temperature (stated in [G1]PN-EN 1991-1-3:2005/NA:2010 as ti)
- U – heat transfer coefficient of the roof partition [W/(m²·K)]
Generate snow load dialogue
When you select the Generate tool, a new dialogue window opens. Here you can generate snow load automatically based on the selected settings and values.
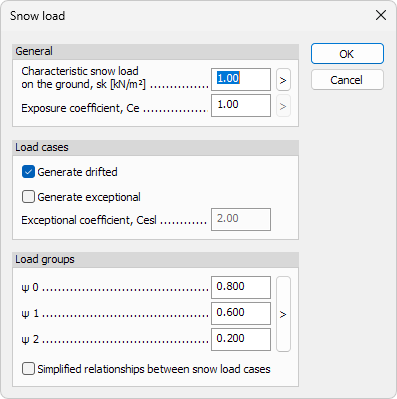
- Characteristic snow load on the ground, sk – set the characteristic snow load on the ground
- > – click on the Characteristic snow load calculator arrow button next to the numeric field to open a new dialogue window for automatic calculation of the Characteristic snow load on the ground, sk. Only available on some design codes (read below in more detail).
- Exposure coefficient, Ce – set the exposure coefficient
- > – click on the Exposure coefficient calculator arrow button next to the numeric field to open a new dialogue window for automatic calculation of the Exposure coefficient, Ce. Only available on some design codes (read below in more detail).
- Generate drifted – select if you want the snow load to be generated by drifted condition in the Eurocode
- Generate exceptional – select if you want the snow load to be generated by exceptional condition in the Eurocode
- Exceptional coefficient, Cesl – set the coefficient for exceptional snow loads
- ψ0 – factor for combination value of a snow action
- ψ1 – factor for frequent value of a snow action
- ψ2 – factor for quasi-permanent value of a snow action
- > – click on the ψ value selection arrow button next to the numeric field to open a new dialogue window to select the combination factors from a list. (read below in more detail).
- Simplified relationships between snow load cases – select if you only want to generate snow load group which contain all the local load cases in one relationship. If unselected, then different relationships for each local load cases may be created, resulting in larger number of relationships.
After pressing OK button, snow loads are generated and assigned to one of the following load cases:
- Snow load, undrifted (SL,UD)
- Snow load, drifted, global, wind direction X+ (SL,DGX+)
- Snow load, drifted, global, wind direction X- (SL,DGX-)
- Snow load, drifted, global, wind direction Y+ (SL,DGY+)
- Snow load, drifted, global, wind direction Y- (SL,DGY-)
- Snow load, drifted, local, wind direction X+ (SL,DLX+)
- Snow load, drifted, local, wind direction X- (SL,DLX+)
- Snow load, drifted, local, wind direction Y+ (SL,DLX+)
- Snow load, drifted, local, wind direction Y- (SL,DLX+)
- Undrifted load case always acts alone.
- Global loads act on the whole roof. Drifted global load cases can act alone or together with another global load case that is not parallel with them.
- Local loads act on a part of the roof, eg. at attic walls and tall buildings. These load cases contain only that part of the load defined by Eurocode that is above the global load of the roof. Drifted local load cases always act together with the global load case in the same direction, but they can also be combined with any other local load case(s).
- Some of the above mentioned load cases may not be generated if they are not necessary.
To read about load case relationship in load groups see the topic
User interface ➔ Tab menus ➔ Loads ➔ Panel Load case, combination, group and construction stage ➔ Load groups
Characteristic snow load calculator
When you click on the Characteristic snow load calculator arrow button next to the Characteristic snow load on the ground, sk numeric field, a new dialogue window opens depending on the selected design code. Only available for some design codes.
There are several dialogue windows for different codes:
-
Only altitude - for Belgian and Hungarian code

-
Only region selection - for Estonian and Latvian code

-
Region selection with altitude value - for British, German, Polish, Romanian and Spanish code

-
Region selection from list of place names and altitude value - for Norwegian code

-
Region selection from list of place names and corresponding zone names - for Swedish code

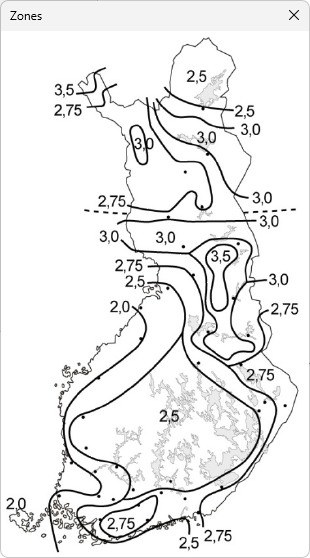
-
Only region map for visual confirmation - for Finnish code
In the dialogue windows you can change and select:
- Altitude – set the altitude above sea level
- Region as a place name - for dialogue windows that have place names, the regions will be the place names
- Filter by - for dialogue windows that have place names, you can use filter fo find the place more easily.
- Region as a zone name - for dialogue windows that do not have place names, the regions will instead be list of zones. Zone names may be unique and different, since they are depending on the design code.
- Zones – for dialogue windows that have region as a place name, there may be a separate list of zones. Zone names may be unique and different, since they are depending on the design code.
- Show map > – use the button to show a new dialogue window with the map for the selected design code country, with the zones marked.
Exposure coefficient calculator
When you click on the Exposure coefficient calculator arrow button next to the Exposure coefficient, Ce numeric field, a new dialogue window opens depending on the selected design code. Only available for some design codes.
There are several dialogue windows for different codes:
-
Only topography settings - for Eurocode, British, Finnish, German, Hungarian, Latvian, Norwegian, Polish, Romanian and Spanish code

-
Topography and building size - Danish code

In the dialogue windows you can change and select:
- Topography – select one of the topography options in Eurocode
- Longer side (l1) – change the length of the building's longer side
- Shorter side (l2) – change the length of the building's shorter side
- Height (h) – change the length of the building's height
ψ value selection for combination factors
When you click on the ψ value selection arrow button next to the combination factors' numeric fields, a new dialogue window opens.
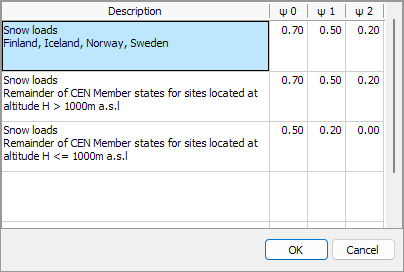
Here you can see a list of Eurocode preset combination factors for different countries. You can select one row to automatically fill in the values for the previous combination factors.
Generate edge objects automatically
The Generate edge objects automatically tool opens a new Snow load panel edge object wizard dialogue window. Here you can generate the Edge objects automatically based on the selected criteria.

Minimum height for
- Attic wall – set the minimum height for attic wall. Edge objects near walls that are equal or higher than this value, will be automatically set as Attic wall type.
- Tall building – set the minimum height for tall building wall. Edge objects near walls that are equal or higher than this value, will be automatically set as Tall building type.
Other objects to generate
- None – select if you do not want to automatically generate any other type of Edge objects than the Attic wall and Tall building
- Snow fence – select if you also want to automatically generate Snow fence type of Edge objects
- Snow overhang – select if you also want to automatically generate Snow overhang type of Edge objects
- x – set the distance of the overhang
- k – coefficient for the irregular shape of the snow
Roof slope
- Minimum angle – set minimum angle of Lean-to and Ridge roofs where the software will automatically generate Edge objects. Only relevant when Snow fence or Snow overhang has been selected from the Other objects to generate group above.