Numeric value
The Numeric value tool is used to manually place and manage numeric result values in the model view.
![]()
When you activate this tool, a tool palette opens.

Main tools
- Define – place new numeric values using different selection methods
- Properties – view or edit the properties of existing numeric values. Opens the Default settings dialogue for the selected items
- Automatic arrangement – use this tool to select existing numeric values and automatically arrange them to minimise overlapping
- Reset position – reset values that were selected with Automatic arrangement or manually moved numeric values to their original positions
- Default settings – open the default settings dialogue for numeric values (read below in more detail)
Options
- Auto arrange numeric values – when enabled, numeric values are automatically arranged after creation
Defining tools
When Define is selected, the following sub-tools are available:
- Select – manually select objects or points to place numeric values at
- Find only absolute maximum / minimum – find and place only the extreme values of the selected objects
- Find all local maximum / minimum – find and place all local extreme values on the selected objects
Selecting elements
- Selected objects – evaluate only the selected objects
- Selected points – evaluate only the selected points
Values to display
- Minimum – find the lowest value
- Maximum – find the highest value
- Minimum and maximum – find both the lowest and highest values
- Maximum of absolute values – find the highest absolute value (positive or negative). This is only available for Find only absolute maximum / minimum defining tool
For local values, you can use filtering to reduce the amount of values on screen.
- Filtering – use the slider to control how many local values are displayed. Increasing the filtering value reduces the number of displayed local extremes
Default settings
When you press Default settings button, a new dialogue window opens where you can control the appearance of numeric values.
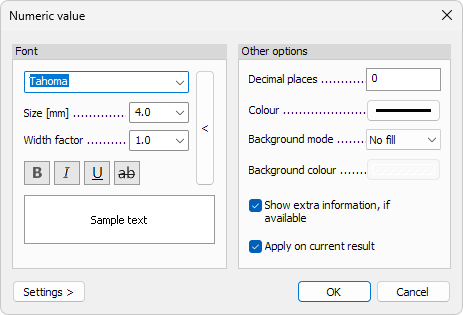
Font
- Font – select the font family used for numeric values
- Size – change the text height
- Width factor – control the horizontal scaling of the text
- B, I, U – apply bold, italic or underline formatting
ab- display the text with a strike-through effect- Get default arrow button - restore all the settings to their default values
A live preview is shown in the Sample text field.
Other options
- Decimal places – define the number of decimals shown for numeric values
- Colour – set the text colour of numeric values
- Background mode – choose how the background of numeric values is displayed
- No fill – no background colour. The background is transparent
- Auto – select the background colour based on the colour of the text
- Colour – select the background colour separately
- Background colour – set the background colour (only available when Colour option is selected for the Background mode)
Additional options:
- Show extra information, if available – display supplementary information for numeric values when the result type supports it
- Apply on current result – immediately apply the settings to the currently displayed result
Settings >
The Settings > button opens a menu for managing display presets:
- Save – save the current display settings
- Load – load previously saved display settings
- Save as default – store the current settings as default for future use
- Load default – restore the program’s default display settings