Automatic numeric values
The Automatic numeric values tool is used to automatically place numeric result values (such as minimums, maximums, or values at specific points) directly in the model view.
![]()
When you activate this tool, a pop-up window opens.
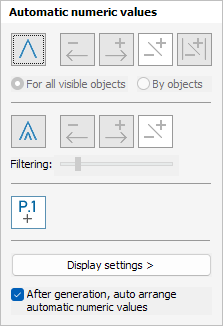
Main functions
- Global maximum / minimum – displays global extreme values based on the selected result type
- Local maximum / minimum – displays local extreme values along elements or surfaces
- Result point – displays the numeric value at a user-defined Result points point
To read more about the Result point see the topic:
User interface ➔ Tab menus ➔ Analysis ➔ Panel Auxiliary result objects ➔ Result point
Type of global values
When Global maximum / minimum is enabled, additional options become available:
- Global minimum – show the lowest global value
- Global maximum – show the highest global value
- Global minimum and maximum – show both the lowest and highest global values at the same time
- Global absolute maximum – show the highest absolute value
Two radio buttons define how the global values are evaluated:
- For all visible objects - The global values are calculated considering all currently visible objects in the model view
- By objects – global values are calculated separately for each object
Local maximum / minimum
When Local maximum / minimum is enabled, the following options are available:
- Local minimum – show the lowest local values
- Local maximum – show the highest local values
- Local minimum and maximum – show both the lowest and highest local values at the same time
For local value, you can use filtering to reduce the amount of values on screen.
- Filtering - use the slider to control how many local values are displayed. Increasing the filtering value reduces the number of displayed local extremes, helping to avoid clutter in dense result fields
General options
At the bottom of the window, two general options are available:
- Display settings > – opens a separate dialogue window where you can fine-tune the appearance and behaviour of automatic numeric values (read below in more detail)
- After generation, auto arrange automatic numeric values – when enabled, the generated numeric values are automatically arranged to minimise overlapping and improve readability
Display settings
When you press Display settings >, a new dialogue window opens where you can control the appearance of automatic numeric values.
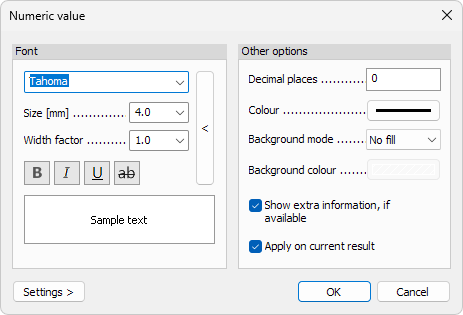
Font
- Font – select the font family used for numeric values
- Size – change the text height
- Width factor – control the horizontal scaling of the text
- B, I, U – apply bold, italic or underline formatting
ab- display the text with a strike-through effect- Get default arrow button - restore all the settings to their default values
A live preview is shown in the Sample text field.
Other options
- Decimal places – define the number of decimals shown for numeric values
- Colour – set the text colour of numeric values
- Background mode – choose how the background of numeric values is displayed
- No fill – no background colour. The background is transparent
- Auto – select the background colour based on the colour of the text
- Colour – select the background colour separately
- Background colour – set the background colour (only available when Colour option is selected for the Background mode)
Additional options:
- Show extra information, if available – display supplementary information for numeric values when the result type supports it
- Apply on current result – immediately apply the settings to the currently displayed result
Settings >
The Settings > button opens a menu for managing display presets:
- Save – save the current display settings
- Load – load previously saved display settings
- Save as default – store the current settings as default for future use
- Load default – restore the program’s default display settings